
In this article we will look at how a free plugin can be used to add Braintree Payments to your WooCommerce website. The WooCommerce Braintree Payment Gateway Plugin available from WordPress.Org is a compact plugin that shares great compatibility with WooCommerce and WordPress plugins.
The WooCommerce Braintree Payment Gateway Plugin offers a simple way to add Braintree to the WooCommerce platform.
What is WooCommerce? What is Braintree?
If you are new to the WordPress world, you may have two questions when landing on this article;
- What is WooCommerce?
- What is Braintree?
WooCommerce is one of the leading eCommerce plugins for WordPress. This means that by using this plugin you are able to advertise and sell goods and services to customers who land on your website. WooCommerce allows admin to choose between over a 100 payment gateways to sell their products through.
While many website owners are familiar with PayPal, their sister payment gateway, Braintree is often less heard of. Braintree is similar to Stripe in the way it allows you to accept credit card payments. Braintree in recent years after being acquired by the eCommerce giant PayPal has seen many business owners switching to the gateway due to the many different ways to sell to customers globally.
Considerations When Adding Braintree as a Payment Option
To add Braintree as a payment option in your WooCommerce checkout page, you will need to:
- Have set up a Braintree Merchant Account
- Have WooCommerce Installed, Activated and Set Up on Your WordPress Website
- Have Downloaded and Installed the WooCommerce Braintree Payment Gateway
- Your Website Should have an SSL Certificate (https website).
- You will not be able to set up a live Braintree checkout without using SSL certificate on your website.
If you have not used Braintree previously to accept payments from customers, it is a good idea to note down the transaction fees that will be charged and run through a test checkout as if you were a customer to ensure that it is a smooth and hassle free procedure for prospective buyers.
Why Should I Use the Braintree Plugin on my eCommerce Website?
Many website owners are choosing to use Braintree on their WooCommerce site as it allows the customer to complete an entire transaction without ever needing to leave the website. This is quick and hassle free for the customer and in turn can lead to higher conversion rates. In some circumstances, Braintree transaction fees can work out cheaper than the fees advertised by other large payment gateways.
How Can I Add Braintree as a Payment Option in my WooCommerce Checkout?
If you have WooCommerce set up on your WordPress website, you’ll now need to install and activate the WooCommerce Braintree Payment Gateway Plugin. This is a free plugin on WordPress.Org.
Video Tutorial:
Written Tutorial:
Step 1) Log into your WordPress website.
Step 2)Ensure you have WooCommerce and the Braintree Plugin Installed and Activated.

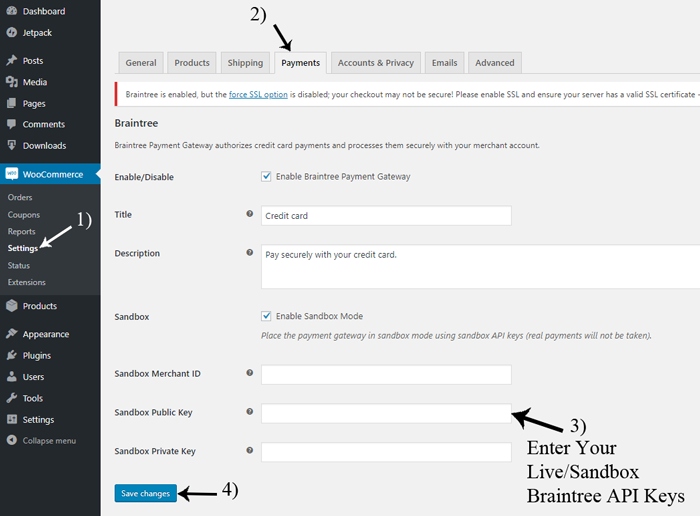
Step 3) Click on ‘WooCommerce‘ and then on the ‘Settings‘ menu. From there you’ll need to locate and click on the ‘Payments‘ tab.
Step 4) From the ‘Payments‘ tab, you will see the option to enable ‘Braintree‘. Slide the toggle bar across to enable ‘Braintree‘ on your WooCommerce checkout.
Step 5) Click the Set Up button. If you do not have an SSL certificate, you will only be able to do test transactions. At this stage you will need to obtain an SSL certificate if you wish to allow customers to pay for goods and services with the Braintree Payment Gateway.
Step 6) Enter your sandbox API Keys which can be found in your Braintree account. If you wish to run live transactions and you have an SSL certificate, you can enter your Live API Keys. If you do not know where to find your API keys, please see the video tutorial below.
Step 7) Click the ‘Save changes‘ button.
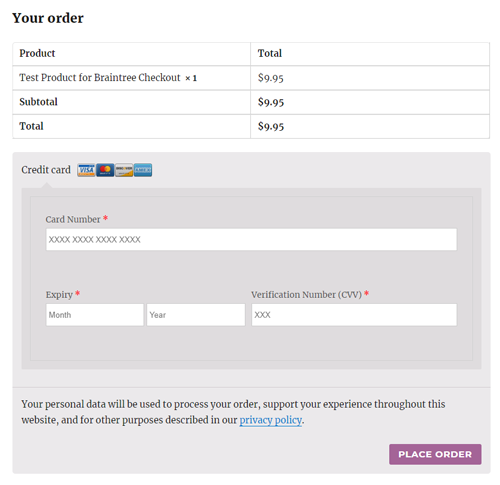
Step 8) If you have entered in your details correctly, when you click to checkout with a product/service created using WooCommerce, the option to pay with credit card (Braintree) should appear.
Where Can I Locate My Braintree Sandbox API Keys?
If you are unsure how to find your sandbox Braintree API Keys, please see the video tutorial below for step by step instructions. These keys are vital in the set up process explained above. Without your Braintree API keys, you will not be able to add Braintree as an WooCommerce checkout option.
Where Can I Locate WooCommerce Braintree Orders/Payments?
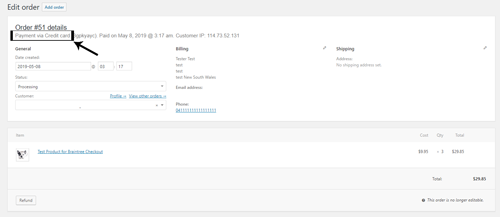
Once a customer has successfully checked out on your website with the Braintree payment gateway, you will see a notification next to the orders menu. You may notice that the status is processing if the credit card payment is yet to clear. The customers details can be viewed by clicking on the order in question. A Braintree checkout can be identified as in the order details you will see the line: ‘Payment via Credit Card’. If needed, you can also refund the payment from the order menu.
How Can I Complete a Test Credit Card WooCommerce Checkout?
If you have set up the WooCommerce Braintree Payment Gateway using Braintree Sandbox API Keys, and you have marked the checkbox to enable sandbox payments (WooCommerce>Settings>Payments>Enable Sandbox Mode) you will be able to complete a test credit card checkout by following the steps below. Completing a test transaction allows you to see the process your customers will need to follow to complete a transaction on your website.
- Create a test product following the WooCommerce product creation steps.
- Ensure you have entered your Braintree Sandbox API details into the Braintree Plugin. Also ensure the checkbox to enable sandbox payments has been marked.
- On the front end of your site, view the product page. Click the ‘Add to Cart‘ button for your product.
- Click the ‘View Cart‘ button.
- Click the ‘Proceed to Checkout‘ button.
- Enter in test ‘Billing Details‘.
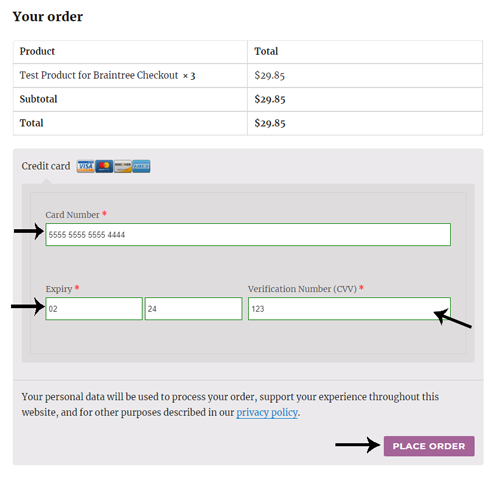
- Within the Credit Card Section, choose to use a Braintree Test Credit Card Number. Eg ‘5555555555554444’
- The expiry of the card must be a month/year in the future and the CVV must be a three number combination such as ‘123’.
- Click the ‘Place Order‘ button.
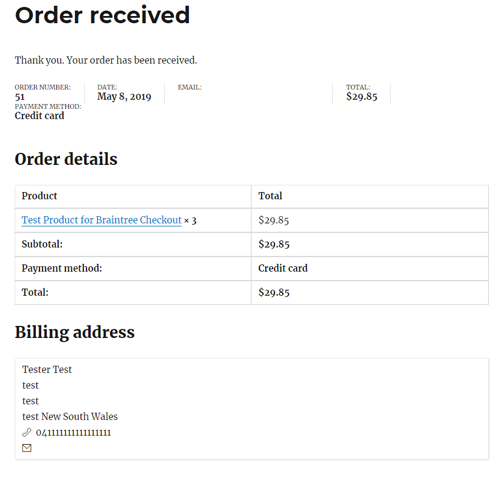
- If the order is successful, you will see the ‘Order Received‘ page.
Leave a Reply