One of our users site got hacked and the WP Admin user account password was changed by the hacker. This essentially locked the user out of his admin dashboard. It is best (for situations like this) to just create a new admin user account to gain access to WP admin dashboard and fix things as needed.
In this tutorial I will show you how you can create a new WordPress admin user account via MySQL database (without having access to your WordPress admin dashboard).
Alternatively, you can add a WordPress admin user account via PHP.
Note: You can ONLY do this if you are the site owner. You need to have access to cPanel/Control Panel of your server (comes with your hosting plan). If you don’t know the details of your cPanel login then ask your hosting provider.
Step 1) Access Your MySQL Database
- Log into your cPanel/Control panel
- Go to “Database” section
- Click on PHPMyAdmin icon

Step 2) Go to the WP Users table
- Select your WordPress database from the list of databases in PhpMyAdmin
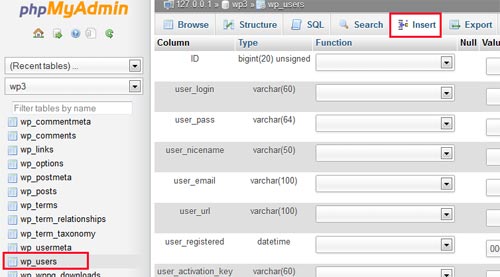
- Go to the WP Users table and click on the “insert” link

Step 3) Insert a New Record in the Users Table
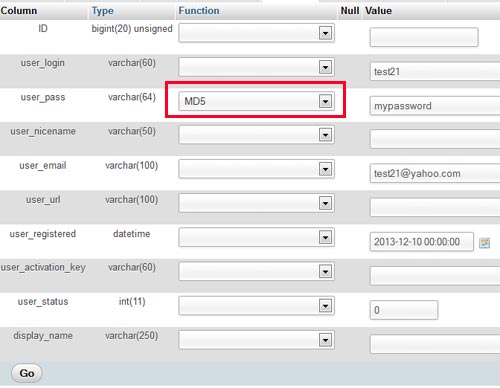
You will need to fill in the following fields to insert a new user record:
- ID – Keep the value of this field empty (it will automatically assign the correct value for it)
- user_login – insert the username you want to use
- user_pass – add a password for the account. Select MD5 in the functions menu (Refer to the screenshot below).
- user_nicename – leave this field empty for now
- user_email – add the email address you want to use for this account.
- user_url – leave this field empty for now
- user_registered – select the date/time for when this user is registered.
- user_status – set this to 0.
- display_name – leave this field empty for now
- Click on the Go Button (you should see a success message)

You can go back to the wp_users table and browser the entries to verify that the user record has been inserted correctly (see screenshot below).

Take note of the value if the “ID” field for this newly created user (we will need this ID field’s value for the next step). In this case the ID is 2.
Step 4) Insert User Meta Values
This is the final step where we will assign some user meta values to the user account we just created.
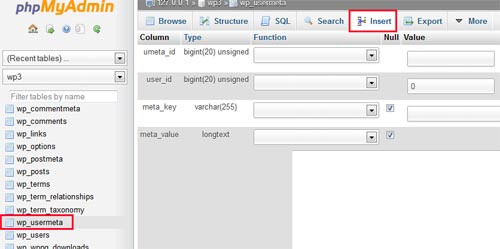
Go to the “wp_usermeta” table and click on the “insert” link:

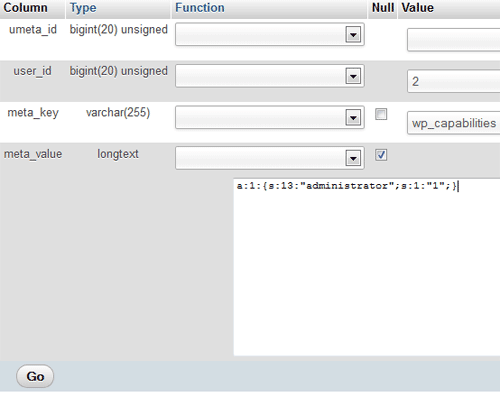
Use the following values and click the “Go” button to insert the usermeta data
- umeta_id – Leave it blank (it will be generated for you)
- user_id – This is the ID of the user we created in the previous step. For our case it is 2.
- meta_key – Use wp_capabilities
- meta_value – Use the following value for this field:
a:1:{s:13:"administrator";s:1:"1";}
See screenshot below

All done!
You can now log into your WP site using this newly created WP User account. You can use this account to change the password and role of your other user accounts or delete them (if you want to).
I think you’re missing updating the “wp_user_level” user meta key for that user. I had to set that to “10” in order to get it to work.
Like so:
INSERT INTO `databasename`.`wp_usermeta` (`umeta_id`, `user_id`, `meta_key`, `meta_value`) VALUES (NULL, ‘your_user_id’, ‘wp_user_level’, ’10’);
Best,
Jan
Thank You so much for your help. I might of had some chance to figure this out if I had time but the Meta_Value is priceless information. Your the best!
You rock….thanks so much this just saved me. Thank You!
My work around was to change the password of one of the old users. I was then able to login as them and check the user I had created. I noticed that under role for my new user it said none. I changed it to administrator and then logged out and in as the new user. This time it worked.
The above worked till I tried to login and failed with: a:1:{s:13:”administrator”;s:1:”1″;}
My work around was to use this instead: a:1:{s:13:”administrator”;b:1;}
Thanks all the same!