What to Expect From a ClickBank Integration
ClickBank integration is good for adding a Buy button like the one shown below to allow a checkout of your product from the landing/pitch page. When the button is clicked the visitor is sent to ClickBank for payment. After the payment the customer will receive an email which will contain encrypted download link for the item he/she just paid for.

ClickBank is not ideal for running a store where you expect your customers to add multiple items to the shopping cart and then checkout.
ClickBank Limitations
ClickBank has the following checkout limitations:
- ClickBank only lets you checkout a product that you have configured in your ClickBank account. So you will need to configure the product in Your ClickBank account.
- ClickBank only lets you do one item checkout at a time. So you cannot add 5 items to the shopping cart and checkout via ClickBank.
ClickBank Setup Steps
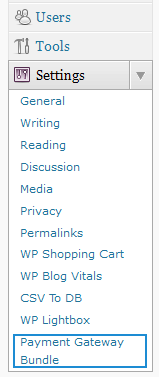
After you install the WP Payment Gateway Bundle plugin you will need to configure some ClickBank specific settings in the plugin and in your ClickBank merchant/vendor account. You can find the ClickBank specific settings under the “Gateway Settings†tab when you go to the payment gateway bundle plugin’s settings menu. The following screenshot shows how you can access the settings page of this plugin:

Payment Gateway Bundle Plugin Settings
In order to complete the ClickBank settings simply follow the steps outlined below

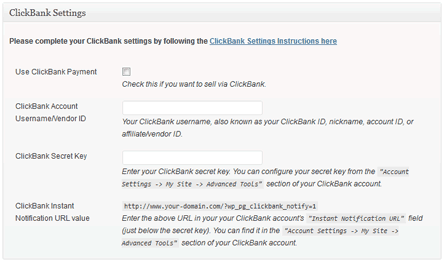
ClickBank Setup Settings
Step 1: Check the “Use ClickBank Payment†option from the ClickBank Settings section.
Step 2: Enter your ClickBank Account Username, also known as your ClickBank ID, nickname, account ID, or affiliate/vendor ID.
Step 3: Enter your ClickBank account secret key. You can configure your secret key from the "Account Settings -> My Site -> Advanced Tools" section of your ClickBank account.
Step 4: Hit the “Update†button at the bottom to save the settings.
Step 5:Â Log into your ClickBank account and Edit your “Advanced Tools” section. Enter the URL shown in the “ClickBank Instant Notification URL value” field of the plugin’s ClickBank settings section. The URL will look similar to the example shown below
http://www.your-domain.com/?wp_pg_clickbank_notify=1
Step 6: Now that all the setup is complete you can use the following sortcode to place a “Buy” button for your eStore and ClickBank product:
[wp_pg_eStore_clickbank_buy_now cb_item_number="1" product_id="4"]
cb_item_number = Your Clickbank product item number
product_id = Your WP eStore product ID for this item
Customizing the Look of the Clickbank Buy Now Button
WP eStore plugin allows you to customize all of your buy now buttons by using a custom button image of your choice. If you want to customize the look of your Clickbank buy now button then read this post.
Note: We provide technical support for our premium plugins via our customer only support forum
