After you install the WP Payment Gateway Bundle plugin you will need to configure some FreshBook specific settings in the plugin which you will need to obtain from your FreshBooks account.
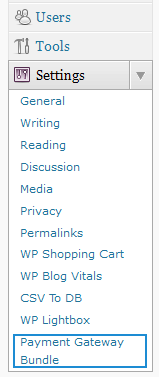
You can find the FreshBooks specific settings under the “Gateway Settings†tab when you go to the payment gateway bundle plugin’s settings menu. The following screenshot shows how you can access the settings page of this plugin:

Payment Gateway Bundle Plugin Settings
In order to configure the FreshBooks portion of the payment gateway bundle you will need to obtain the required details from your FreshBooks account by following the steps outlined below:
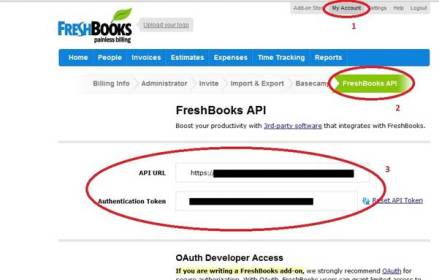
Step 1:Â Log in to your FreshBooks account and click on the My Account link and then click on the FreshBooks API menu item (see 1 and 2 in figure below).
Step 2: Copy the values for the API URL and Authentication Token fields as shown by “3†in the figure below.

Getting Freshbooks API Details
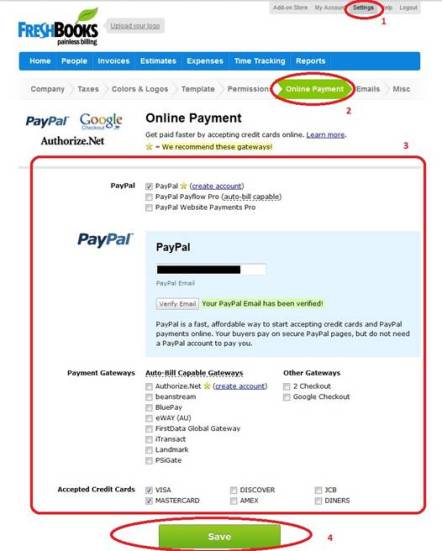
Step 3: Now ensure that you have configured your FreshBooks account so it can accept online payments by going to Settings and then clicking Online Payment as shown in the figure below:

Freshbooks Online Payment Setup
You can specify various payment options as shown in “3†in the figure above and once you have selected options you want, click on the “Save†button to save you your changes.
Step 4: Now from your eStore plugin menu in your WordPress administration panel, go to Freshbooks Settings (under Payment Gateway Bundle->Gateway Settings) and check “Use Freshbooks Payment Gateway†option.
Step 5:Â Enter your API URL.
Step 6:Â Enter your Authentication token.
Step 7:Â Enter a selector Label for Freshbooks or you can leave this as default. (This text will be displayed in the select box if a customer chooses Freshbooks for checkout).
Step 8: Hit the “Update†button at the bottom to save the settings and now you are ready to use Freshbooks with the WP Payment Gateway Bundle Plugin.
Note: We provide technical support for our premium plugins via our customer only support forum