If you run Google Adwords campaigns and you want to know which of your keywords best leads to clicks and conversions, such as sales, conversion tracking can help you. The conversion tracking tool in AdWords can show you what happens after customers click your ad (for example, whether they purchased your product or not).
The eStore conversion tracking addon plugin adds conversion tracking functionality to your store.
Installing the Conversion Tracking Addon
You can install this addon the same way you install any WordPress plugin:
- Go to the “Add New†plugins screen in your WordPress admin area
- Click the “upload†tab
- Browse for the addon file (estore-adwords-conversion-tracking.zip)
- Click “Install Now†and then activate the plugin
Using This Addon
After you active this addon, You need to configure some settings related to this addon.
Click on the “Adwords Conversion†sub-menu under the eStore plugin’s admin menu.
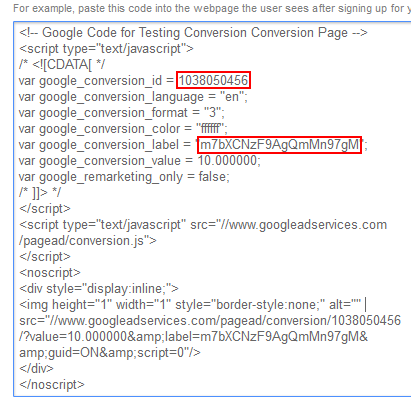
You need the following two pieces of information from your Google Adwords account:
- Conversion Label
- Conversion ID
Follow this tutorial to get your conversion tracking code.
Your conversion tracking code should look like the following (the two pieces of information you need from this code is highlighted):

Once you have the “Conversion Label and “Conversion ID” values, enter them in the settings of this addon:
![]()
Save the settings and your store will start to do the conversion tracking.
Download the Addon (v1.0)
You can download this addon from the addon download area of our support forum.
Please note that some of these free eStore addons are developed by our users in the community. So they do not have any advanced customization option. The description above explains exactly what this addon does.
Note: We provide technical support for our premium plugins via our customer only support forum