2FA, the common abbreviation for two-factor authentication is a word often spoken about when one is setting up a website or account where security is vital. With more and more confidential information being uploaded on the net, it makes sense to add additional measures to prevent hackers from gaining access to an account. In terms of PayPal and two-factor authentication, when you create an account you have the option to complete a few steps to add extra layers of security (2FA). In this tutorial, we will look at the simple steps that can be followed to enable two-factor authentication for a PayPal account.

What is 2FA?
Two Factor Authentication (2FA) in simpler terms is adding an additional layer of security to a login to prevent hackers from gaining access to sensitive information. Think of 2FA as adding a virtual security door to your platform (website, bank account, member login). 2FA is often an option that can be enabled on a website where you are storing sensitive information. For example, many banks offer 2FA to their customers for their online portals. PayPal, a global name in online payments allows their customers to enable the 2FA feature of their account to add an additional layer of security.
2FA comes in many different forms with it often involving the use of a secondary device such as a mobile phone where a code can be sent to the ‘real’ account holder. The account holder can then enter this code after their correct login details to gain access. It often makes sense to use a mobile phone or email account as the second authentication step as only the account holder should have access to these.
Two-factor authentication requires you to provide two pieces of information to prove you are the ‘real’ owner of the account. There are three types of authentication including something you know, something you have and something you are. When speaking about online 2FA, generally something you know (login name and password) along with something you have (such as a code sent to a mobile phone number) are used.
To read up on more information about two-factor authentication please see our related article here.
Why Should I Enable 2FA for PayPal?
We will get to the ‘How to Enable 2FA for PayPal‘ in just the next section but before that, it is important to understand ‘Why’ 2FA may be important for your PayPal account. Accounts, where you store sensitive information such as your personal address and bank details, should have multiple layers of security. 2FA allows you to achieve a multi-layer security system that should stop any potential hackers in their attempt to gain access. Without the device or details to a secondary account, hackers will not be able to proceed to log in, and therefore cannot acquire your sensitive information. Within your PayPal account, you may have added your bank cards and your current address, date of birth, or even your occupation. These are sensitive pieces of information. These sensitive pieces of information hackers can use to siphon money from your bank account. Not only will 2FA prevent potential hacks into your account, but it will also act as an alert if there has been an attempt as you will receive a ‘code’ to your mobile or application each time a login is attempted. This gives account owners the opportunity to change their passwords to something of greater strength to safe guard the account.
While no amount of authentication steps can ensure 100% security of your account, a hacker is far less likely to try and crack the code on an account where 2FA is enabled compared to a single login account. If you are a merchant it is extra important to enable 2FA to ensure your company is protected from hackers trying to gain access to transaction details and more importantly funds that you may have stored in your account.
Is 2FA a Hassle When Logging in to PayPal?
When you enable 2FA for your PayPal account, it will mean you will need to enter an additional piece of information prior to logging in. While this may take you a moment longer, the benefits definitely outweigh the hassle. In fact, many systems such as internet banking are making 2FA logins mandatory.
If you have opted for the secondary authentication code to be sent to your mobile via SMS, you will need to make sure you have mobile phone service at the time of the login. If you have chosen to be sent the code via an application, you will need to have internet access which you would already be hooked up to for access to the PayPal account.
Enabling Two-Factor Authentication (2FA) for my PayPal Account: Video Tutorial
Enabling Two-Factor Authentication (2FA) for my PayPal Account: Written Tutorial
When you set up a PayPal account, 2FA is not automatically enabled. In this section, we will take a look at the simple steps in ensuring your PayPal account is protected by two layers of security when logging in.
PayPal offers two different ways of providing users with the second authentication code. You can choose to set it up so the code is sent to you via text message or via an authentication app. Some vouch using an application provides hackers with less ability to intercept the text message to receive the code while others believe being sent the code straight to their mobile in messages is simpler and easier to then input into the required PayPal authentication field. Whichever of the two methods you choose, both will add a second layer of security to your PayPal account.
Before you proceed to follow the steps below you will need to consider which way you wish to receive the 2FA code each time you login in to your PayPal account:
- Via Text Message (SMS)
or
- Via a Smartphone Application
Enabling 2FA for PayPal

- First things, first. You will need to start by logging into your PayPal account. If you are yet to create an account, doing so is simple and free. We have some PayPal related videos here that will get you started.
- Once you are in your PayPal account, click on the ‘Cog’ Settings icon. Then you will need to click on ‘Your Profile‘. This will take you to the profile settings page.
- Click the ‘Update‘ button within the 2-step Verification section.
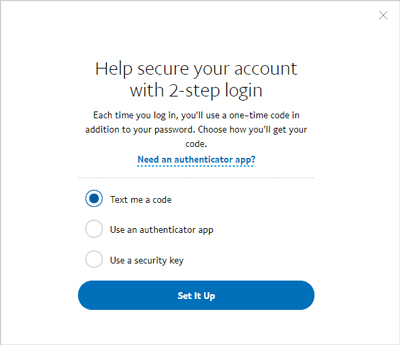
- You will now see a number of options to choose from to better secure your PayPal account. You can choose between ‘Text me a code‘, ‘Use an authenticator app‘ or ‘Use a security key‘.
- Once you have selected the way you would like to receive the code for the two-factor authentication, click ‘Set It Up‘.
- If you are choosing to set it up so that you receive the code via SMS, you will need to add the appropriate phone number or follow the simple on-screen steps to link up an authenticator application.
- Click ‘Next‘ and confirm you are the ‘real’ owner of the secondary authentication by providing the code sent to you by PayPal.
- You can add back up devices at this stage if you wish to. Click ‘Done‘ to complete the setup. You can revisit the settings at any time to alter the changes you have made.

Logging Into PayPal with 2FA
If you have enabled two-factor authentication for your PayPal account (instructions on how to do so found in the above section), each time you log in, you will need to enter your normal credentials (username and password) along with a code sent to your mobile as an SMS or sent to your authentication application. It is important that once you receive the code you enter it promptly as it will only last ten minutes.
If you have opted to authenticate your login via text message the flow of events will look like the following:
- Sign in to your PayPal account using your email address and password.
- Press continue to be text messaged the unique code.
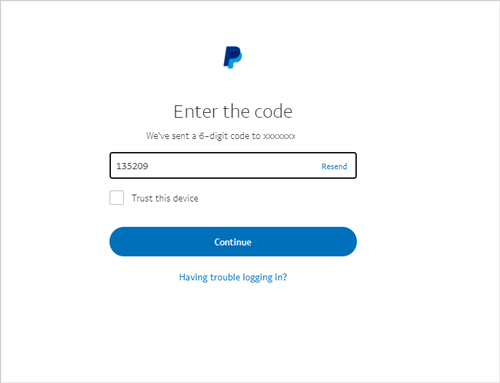
- Open the text message you receive and enter the code into the appropriate field.
- Click ‘Continue‘ if you were able to enter the code, or click the ‘resend‘ button if you are yet to receive the code.
- If you have entered the code correctly, you will be logged into your PayPal dashboard. You will be able to go about your business as normal.

Leave a Reply