If you are new to WordPress, you might feel somewhat overwhelmed by the amount of options available in your Dashboard. Chances are, you won’t need a whole lot of these features right from the start, though. What most people need to launch a successful blog is the knowledge of how to publish a basic post and how to add media to it, the latter being an important component of your success as a blogger.
You should always try to spice up your posts with images, videos and audios. These media elements will help turn any otherwise bland blog into a more visual, interactive experience, which is what appeals to the majority of Internet users these days.
This tutorial will help you get started with WordPress media uploader, easily find your files and the URL of the file when you need them.
Video Tutorial
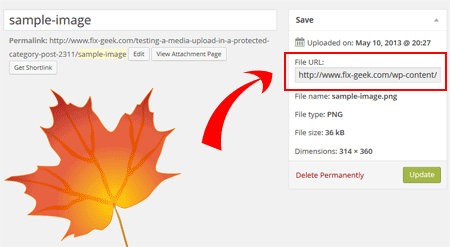
How to Get the File URL of a Media Library Item
Sometimes you might need to know the file URL of a media so you can use it in a plugin or some other part of your site. You can easily get the File URL of a media library item just by editing that item from your admin dashboard. Look at the “File URL” field value in the top right hand corner for the URL value of a file. You can mouse click on that field then hit “CTRL + A” keys to select that full URL field value and copy it.

Adding Media Whilst Creating a New Post
In most instances, you’ll be adding media files as you are creating a new post. In the left-hand menu of your Dashboard, click Add New under Posts. Start writing your new blog post, and as you are ready to embed a media file, place the cursor in the area of the post where you want the image or video to appear. Click the Add Media button, located below the post title and above the controls panel, also known as the “Kitchen Sink.”
Adding Media From Your Device
Once the media uploader popup opens, select the Upload Files tab. Click Select Files to upload the files no larger than 20 MB from your computer. The complete list of allowed formats can be found here.
Once the file is uploaded, it will show up in your Media Library. On the right-hand side you’ll see attachment details. You should edit some of these fields, including title – make sure it has no spaces in it, otherwise it will not look good inside the URL. Simply replace the spaces with dashes. You’ll need to pay particular attention to the Alt text, which should be a brief description of the file that serves as an important parameter for search engines. Placing a keyword or two in the Alt text is always a good idea. Caption and Description are optional fields. You can also choose the alignment position of the file in the text, and link it to something or just leave this option at None. The size of the file can also be adjusted. Check Insert into Post when you are ready to embed your media file.
Adding Media From a URL
Besides uploading the files from your device, you can also add them to your post by entering a link to a media file. From the uploader popup, simply click Insert from URL. Once the file is uploaded, scroll down to find the same attachment options you saw when uploading the file from your computer.
Adding Media through the Dashboard
From your Dashboard, you can upload files to the Media Library to be used in various posts later. To do this, click Media in the left-hand menu of the Dashboard, followed by Add New. Here you will see a multi-media uploader, which looks slightly different from the single-file uploader you used before. Once your file is uploaded, click the Edit button next to it and scroll down to the bottom of the screen to find the attachment options. Click Update once you are done filling out the info. Your file will now show up in your Media Library. It will be marked as “Unattached,” since it’s not part of a post yet, but you can add it to any post later.
Using Files from the Media Library
You can access your media library anytime either from your Dashboard or from an individual post. Click Media from your Dashboard to view and edit any files you have uploaded. If you want to add a file from the Media Library to a post, open the Add New Post screen and click Add Media. Go to the Media Library tab, where you’ll find the files you have previously uploaded. Once you select an individual file, you’ll see the attachment editing options to the right. Make any necessary changes and click Insert into Post.
Different File Types
WordPress media uploader works the same way no matter what type of file you choose to embed. The only difference you will notice is that when uploading audio and video files, you’ll get an additional option to Embed Media Player in the attachment options. This will allow you to display your media file as a player rather than having it lead to an external link or show up as an attachment to the blog post.
Leave a Reply