If you have found yourself hitting a stand still after using all troubleshooting resources available, you may consider reinstalling WordPress. While reinstalling WordPress on your server should never be a first resort, the method outlined in this article will help you along the way and will ensure you do not loose your valuable content.
We also previously wrote this article on uninstalling and re-installing WordPress.
Before you go ahead and reinstall your WordPress, storing a back up on your computer is vital. While we will not use this backup in the process outlined below, if all else fails, you can rest assured knowing you still have a backup safely secured on your desktop. There are a number of WordPress backup plugins that make backing up a site simple and hassle free. Selecting one of the free plugins below will allow you to complete this mandatory back up prior to moving on:
- Updraft Plus: 2+ million active installs
- BackWPup: 600,000+ active installs
- BackUpWordPress: 200,000+ active installs
- VaultPress: 80,000+ active installs
- WP Database Backup: 70,000+ active installs
- WordPress Backup and Migrate: 70,000+ active installs
Reinstalling WordPress without Loosing Content
Reinstalling WordPress Using FTP
Below we’ve outlined step by step instructions to manually reinstall WordPress without loosing content. This is the most suitable way for anyone who has been locked out of their admin dashboard possibly due to a hack or errors. To complete the following instructions, you will need FTP access. If you do not have your credentials you will need to contact your hosting provider.
Step 1) Complete a Back Up of Content
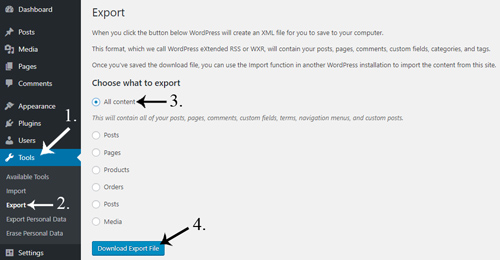
A WordPress export file will be created in this step. This file will contain all your content including pages, posts, comments, categories and tags. This is a crucial step and will ensure your content is safe when a fresh install of WordPress is completed.
- Log into your WordPress dashboard and click on the ‘Tools‘ menu.
- Click on the sub-menu titled ‘Export‘.
- Click on the check circle for ‘All Content‘.
- Click the ‘Download Export File‘ button.
- A file should have downloaded to your computers ‘Downloads‘ library. Ensure that you can locate that file before proceeding.
Step 2) Download Content from cPanel (or Similar)
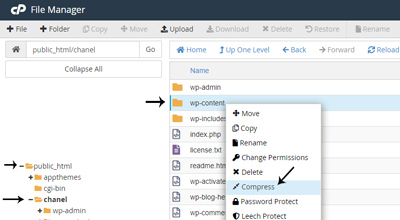
- Log into your ‘cPanel‘ account (or another FTP Client).
- Locate the ‘wp-content‘ folder. Click on ‘File Manager‘, then on ‘public_html‘ and then right click on ‘wp-content‘.
- Click on the ‘Compress‘ button. You should now see a zip file.
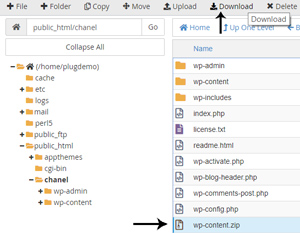
- Click on the zip and then click on the ‘Download‘ button located at the top to download this file to your computer.
- Ensure that the ‘wp-content‘ download is stored on your computer before moving onto the next step.
Step 3) Uninstall WordPress
- In your FTP client, perhaps you are using cPanel, select all files and click ‘Delete‘.
- Confirm deletion if you are prompted to.
- Create a new database. You can choose whether or not you delete the old database.
Step 4) Install Latest WordPress
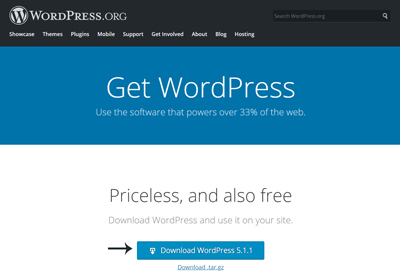
- Go to ‘WordPress.Org‘ and download the latest version of the software.
- Within your FTP Client (cPanel or similar) drag the unzipped files to the public_html folder.
- Once you have uploaded all the files go to your website and enter the new database information you created earlier.
- You will need to click ‘Submit‘ and then click on the ‘Run Install‘ button.
- Click on the ‘Install WordPress‘ button.
Step 5) Delete Default Content and Restore WP-Content
In this step, we will use the wp-content.zip file from Step 2 to restore the contents of the wp-content folder.
- Log into your fresh WordPress website.
- In the WP dashboard, click on the ‘Posts‘ menu.
- Trash any posts. For example the ‘Hello World‘ post. You will need to ensure there are no posts/pages that will conflict when the old data is added to the fresh install.
- Click on the ‘Comments‘ menu and ensure the default comments have been deleted.
- Ensure there are no pages within the ‘Pages‘ menu.
- Log into your FTP Client (cPanel or similar) and locate the ‘public_html‘ folder.
- Click on the ‘wp-content‘ folder.
- Locate the file you previously downloaded in step 2 and drag this inside the ‘wp-content‘ folder.
Step 6) Import WordPress Content from the Dashboard
In this step, we will utilize the XML file downloaded in Step 1 to restore the contents of blog posts, pages, comments, and other related elements.
- Log back into your WordPress dashboard.
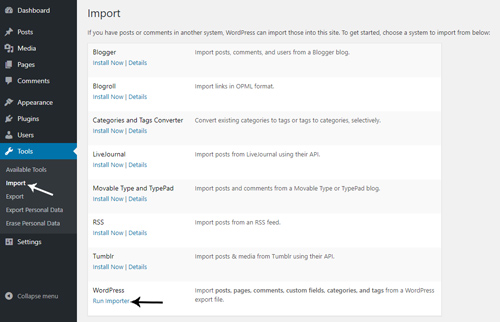
- Click on the ‘Tools‘ menu and then on ‘Import‘.
- Install the WordPress Importer.
- Now click the ‘Run Importer‘ button.
- Click on the ‘Choose File‘ button and select the XML export file that we downloaded in step 1 earlier.
- Click the ‘Upload File and Import‘ button to proceed. You will need to assign an author to the pages. Allow images to be imported to the media gallery.
Step 7) You have Reinstalled WordPress
You have now completed a re-installation of WordPress.
Considerations for Completing a Backup:
- If you have a number of users of your site you may need to consider exporting users
Reinstalling WordPress from the Dashboard (Updating Software)
The following outlines how to reinstall WordPress from the admin dashboard. This will only reinstall the core WordPress files. By completing this method, you will have the latest version of WordPress without corrupted files.
While this method is quick and easy, it does require admin dashboard access. If you do not have access currently to your dashboard, you will need to reinstall WordPress via FTP (outline above).
- Ensure you have backed up your WordPress site. This step is only to ensure you have your data if something is to fail.
- Log into your ‘WordPress dashboard‘.
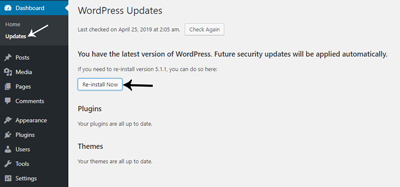
- Click on the ‘Dashboard‘ menu and then on ‘Updates‘.
- Click the ‘Re-install‘ now button.
- You will have simply and easily re-installed WordPress.
@Erik, In Step 1, when you export the data from the WordPress tools menu, it should generate an XML file. This XML file is the one you will utilize in Step 6.
Hello, In step 6 this says to select the XML file we created earlier. Did you mean ZIP file we created earlier?
Thanks for the information. It may have saved an otherwise disastrous site repair. That said you failed to mention that one has to unzip the wp-content folder and upload it as well, being sure not to upload any files that you think may have caused the problem in the first place.