In this guest post Lee Otsubo from The Digital Photo Guy writes about how you can take professional quality pictures by adjusting the exposure of your digital camera using Histogram. Lee is an engineer turned professional photographer who has spent over 35 years in high technology and finally decided to do what he enjoys.

First, a caveat, there are minor differences in the way different digital SLRs meter the scene so you’ll have to “fine tune†your camera depending on how it reacts.
Exposure is the balance of Aperture, Shutter Speed and ISO. This sounds good in theory but seems to baffle quite a few people in practice. Fortunately, there are several controls that make it much easier to “tweak†the exposure.
First and foremost, one of the major advantages of digital cameras is the histogram. Simply put, the histogram graphically shows you how the dark to light pixels are distributed in your image. A quick glance at the histogram will immediately tell you if your photo is overexposed, underexposed or perfectly exposed. To do this, you must learn to correctly read and interpret your histogram.


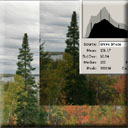
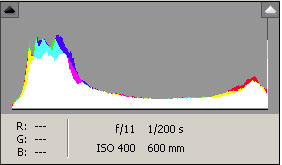
The histogram is of the photo above. In 8-bit files, there are 256 points along the X (horizontal) axis. They aren’t marked because doing so would make the graph way too busy but zero (0) is on the left edge and denotes pure black pixels. To the far right is 255 or pure white. Note that there are very few pure black pixels. Looking at the photo, you can see this is the case. On the right edge you see many pixels. That’s because the photo is overexposed (too light). Pure white pixels are irrecoverable. No details can be seen in pure white pixels.
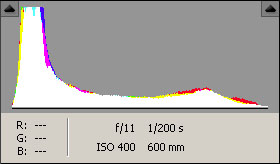
The next image is after the photo has been corrected in Adobe Camera RAW. Camera RAW is the choice of advanced and pro photographers. A primary advantage of RAW is the ability to “take a Mulligan†if your exposure is wrong (within limits). The next image shows the same photo after exposure has been corrected in Adobe Camera RAW.


Notice how the right side of the histogram has been adjusted to end exactly at the right edge of the graph and the left side ends exactly at the left edge. This is a good exposure that uses the entire dynamic range (spectrum of pure black to pure white) of the camera.
Of course, you’re asking, “If I can do this in Photoshop Elements, why worry about the exposure in the camera?†Like most things in life, there are limits to what camera RAW can fix. If the light areas are completely “blownâ€, meaning there are no details and the pixels are completely white, there’s no way to recover any data. Besides, it takes time and effort to adjust each photo. If you are a snapshooter who takes 20-30 photos at a time, this may not be a big deal but advanced amateurs and professional photographers tend to take hundreds of photos at a time. Adjusting each can become quite tiresome. That’s why you want to “nail the exposure†in the camera.


After the first photo of the day and every few photos thereafter, check your histogram. If the left or right edge is touching the sides, increase or decrease EC (exposure compensation) to pull the histogram away from the edge. Sometimes, you’ll have situations where both edges are touching. This means the dynamic range is too wide for the camera. The blacks are too black and the whites are too white and the camera can’t accommodate the entire range. In such cases, decide which is more important, the dark areas or the light areas and adjust EC accordingly.
Dial in minus EC to take away light when the histogram is bunched up on the right which means it’s overexposed. Conversely, if the histogram is stacked up on the left indicating underexposure, add plus EC to increase light. As you practice, it will become second nature to add or subtract EC to get the right exposure.
Another tools provided in most digital cameras is “blinkiesâ€, areas of the photo that blink in the LCD to indicate overexposure. Always check your histogram and “blinkies†to ensure that you capture the desired exposure in the camera.
Don’t forget to visit Lee’s blog to pick up great professional photography tips and tricks.
This is really an educational article. Thanks for posting this. This is a great help to those ordinary photographer turns into extraordinary. Thus having more costumers on their shop.
This is a great post and a great tips! im learning, thank you so much for sharing this wonderful post! keep it up!
Nice post! its interesting and informative, I’ll definitely be coming back to your posts. thanks for sharing!
Thanks for the tips. It’s always good to go back to the basics of photography. Amateurs sometimes missed the details of it.
Hi, interesting post. I have been wondering about this topic,so thanks for blogging. I’ll definitely be coming back to your posts. Keep up great writing
Hello Darla, You may have commented on a wrong post. Perhaps you meant to comment on one of my wordpress PayPal plugin posts? If I knew which plugin you are referring to then I could better answer your question.
I’m really enjoying this plugin but I seem to be having a problem updating quanities. Also, any idea how I get my paypal options included. For example for digestive enzymes we sell 3 sizes. Do I have to do each one individually?
Thanks again for the great plug-in!
Hi Amin,
Good stuff. This Lee guy really knows his stuff… Oh! That’s me! LOL
I’ve been out of town on an assignment so this is the first chance I’ve had to see how the article looks on your blog. Thanks for posting this. Remember, I have dozens more short articles.
Lee
Hi Lee,
Nice article on adjusting exposure to shoot better pictures with a digital camera. It is always nice to learn something new. This was well worth the reading. Cant wait to see your next guest post.