The License Manager plugin gives developers the ability to control the activation and usage of a piece of software via the creation and management of licenses.
By incorporating the License Manager functionality into your software, you will be able to prevent unauthorized usage of your software.
A basic scenario illustrating how the License Manager works
The example below shows one of the ways in which the license manager can be used to manage licenses for a WordPress plugin or theme.
- A customer buys your plugin and after the purchase you automatically create a license key in the License Manger plugin and provide them the license key.
- When they install and activate your plugin they will be asked to enter the license key in order to activate it. At this stage the customer will not able to use the plugin until they successfully activate a valid license key.
- Customer enters the license key in the appropriate “license activation†form somewhere in your plugin’s menu pages and clicks the “activate†button.
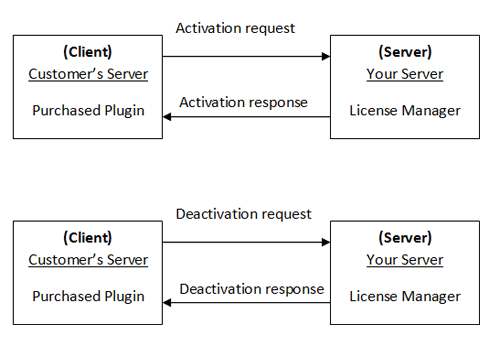
- Upon submitting the license key, the plugin on the customer’s site (ie, the client) will try to communicate with your license server to verify the authenticity of the license.
- Upon receiving the license activation request, the License Manager plugin on your server will check the submitted parameters. Note that your server will ordinarily contain a list of valid license numbers in the database and when it receives the activation request from the client, the License Manager will do the appropriate checks.
- If all the checks pass and the license key which was submitted is valid, the License Manager will return a JSON encoded response which will contain within it a result parameter which will be set as follows:
‘result’ => ‘success’, ‘message’ => ‘License key activated’ - Once the client side (your plugin) receives the “success†response from the server, you know that the customer entered a valid license key that checks out. You can now save this event and grant full access to the functionality available in your plugin.
- If an error was received, then you can show the appropriate error message and not activate the product.
Note: The license manager plugin requires good PHP developer knowledge. So if you are not a developer, you will need to hire one.
Incorporating the License Manager functionality into your plugin
In order to be able to use the License Manager plugin together with your own plugins, you will need to add some code to your own plugin or theme so you can send request to the license server and activate or deactivate license keys.
Sample Plugin/Script Code
The License Manager plugin has some sample code in the form of a simple plugin which illustrates how you can integrate your plugin with the License Manager plugin. You can look at the sample plugin and script code by downloading this zip file.
Setting the Global Variables
When you examine the code in the slm-sample-plugin.php file you will see that there are 3 global variables which you will need to modify as explained below. You will then be able to use these constant values in your code when creating the request query parameters.
1) define(‘YOUR_SPECIAL_SECRET_KEY’, ‘5421048138b321.90598894’);
This variable specifies the value which is set in the license manager plugin settings page for the following: “Secret Key for License Verification Requestsâ€.
You will need to copy the above setting value and paste it in the above code. You will also need to rename the default global variable name to something relevant to your plugin. Example:
define('ACME_PLUGIN_SECRET_KEY', '5421048138b321.90068894');
2) define(‘YOUR_LICENSE_SERVER_URL’, ‘http://www.yoursite.com’);
This variable specifies the URL of your server where the license manager plugin is installed on. Your plugin from a customer’s site will be communicating with this server to activate or deactivate license keys.
You will also need to rename the default global variable name to something relevant to your plugin. Example:
define('ACME_PLUGIN_LICENSE_SERVER_URL', 'http://www.yoursite.com');
3) define(‘YOUR_ITEM_REFERENCE’, ‘ACME Plugin’);
This variable provides a reference label for the licenses which will be issued. Therefore you should enter something specific to describe what the licenses issued are pertaining to.
You will also need to rename the default global variable name to something relevant to your plugin. Example:
define('ACME_PLUGIN_ITEM_REFERENCE', 'ACME Plugin');
As shown in the above examples it is important that you rename the global variables to something uniquely specific to your plugin or theme.
Creating a License Activation Form
In order for your customers to be able to activate or deactivate their licence key, they will need to submit the license key. Therefore you will need to create a license activation form somewhere in your plugin’s admin settings page.
Example code is provided in the sample plugin which shows you how you will need to implement this.
You will note that the license activation query is sent using the native wordpress function “wp_remote_getâ€. The server will respond with a JSON return value which will need to be decoded as shown in the sample code.
The diagrams below show the relationship between the License Manager plugin and the customer’s installation of your plugin:

Creating License Keys on Your License Manager Server
In order to be able to issue licenses to your clients, you will need to create license keys on the server which will be running the License Manager plugin. The license manager plugin will act as your license server where all the valid license keys are stored and you can remotely send request to activate or deactivate license keys.
You can create license keys using two methods:
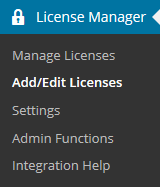
1) Manually – using the License Manager’s Add/Edit Licenses menu
You can use settings page to enter the relevant license details and create a brand new license key in the License Manager DB.

2) Automatically – by sending a request to the License Creation API
The License Manager plugin has an API that you can use to create license keys automatically. This will be handy if you want to create license keys from your e-commerce solution after checkout.
Below is an example snippet of code showing you how you can automatically create license key entry in your license manager.
$api_params = array(
'slm_action' => 'slm_create_new',
'secret_key' => '5421048138b321.90068894',
'first_name' => 'elvis',
'last_name' => 'presley',
'email' => '[email protected]',
'company_name' => 'XYZ',
'txn_id' => 'ABC0987654321',
'max_allowed_domains' => '10',
'date_created' =>date("Y-m-d"),
'date_expiry' =>'2016-01-01',
);

// Send query to the license manager server
$response = wp_remote_get(add_query_arg($api_params, YOUR_LICENSE_SERVER_URL), array('timeout' => 20, 'sslverify' => false));

// Check for error in the response
if (is_wp_error($response)){
echo "Unexpected Error! The query returned with an error.";
}

// License data.
$license_data = json_decode(wp_remote_retrieve_body($response));
You will note from the above example that you also have the ability to specify parameters such as transaction ID (txn_id) which can be handy when you want to reference a particular purchase event to a specific license which was issued.
Example API Response
The following is an example response that will get when sending the license creation API request:
{"result":"success","message":"License successfully created","key":"5580effe188d3"}
Checking A License Key
You can use the API to query and retrieve details of an existing license key. Then from your client application you can do different things based on the status or other aspect of that key.
The following example snippet of code shows how you can query the details of a license:
$api_params = array(
'slm_action' => 'slm_check',
'secret_key' => '5421048138b321.90068894',
'license_key' => 'KEYTOCHECK',
);
// Send query to the license manager server
$response = wp_remote_get(add_query_arg($api_params, YOUR_LICENSE_SERVER_URL), array('timeout' => 20, 'sslverify' => false));
Applying Product Specific Logic to License
Each license key will have the product reference there. If you are selling the license keys via WP Express Checkout plugin or WP eStore plugin then it will have the product ID. Edit a license key from the admin dashboard and you will see the value in the “Product Reference” field.
When you query a license key (to check if it is valid), you can also check what product ID this key is for. Then apply logic to do something accordingly.
Useful Tutorials
See the following tutorials:
- Introduction to Software License Managers
- Software License Manager & Product Communication
- Adding Your Own Custom Fields for the License Keys
- Integrate WP eStore with Software License Manager Plugin
- Integrate WP Express Checkout Plugin with Software License Manager
External Resources
Check out our WordPress plugins page for more cool WordPress plugins.