This tutorial will explain how you can show different navigation menus to your logged in members and non-members if the theme supports WordPress menu.
If your theme has an option where it allows you to show different menu to logged in users and non-logged in users then you do not need to follow this tutorial.
Summary of What We will Do
- We will create two WordPress navigation menus from the “Appearance -> Menus” section of WordPress. One for the “logged in members” and the other for the “non logged in members”.
- We will then change your theme’s code (where the menu is getting displayed from) and replace the existing menu display code with a new dynamic menu display code.
Creating the Menus
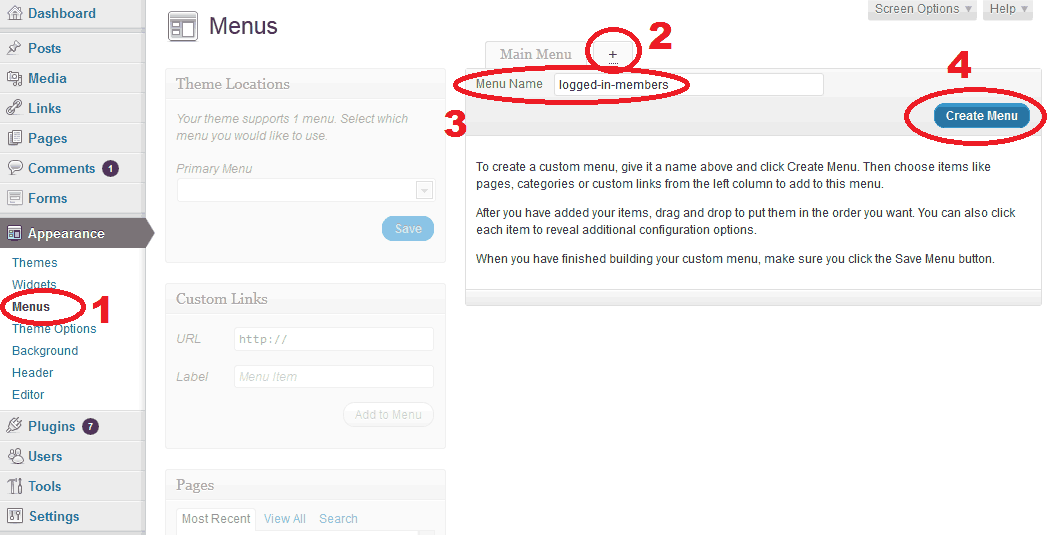
Step 1) Go to the “Appearance -> Menus” section in your WordPress dashboard and create a new menu with the name “logged-in-members” (we want to show this menu to our logged in members)
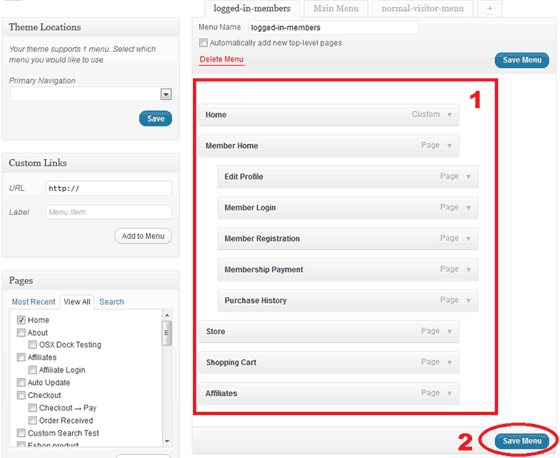
Step 2) Add whatever menu items you want to show to your logged in members in this newly created menu and then save this menu.

Adding Menu Items to Your Newly Created Menu
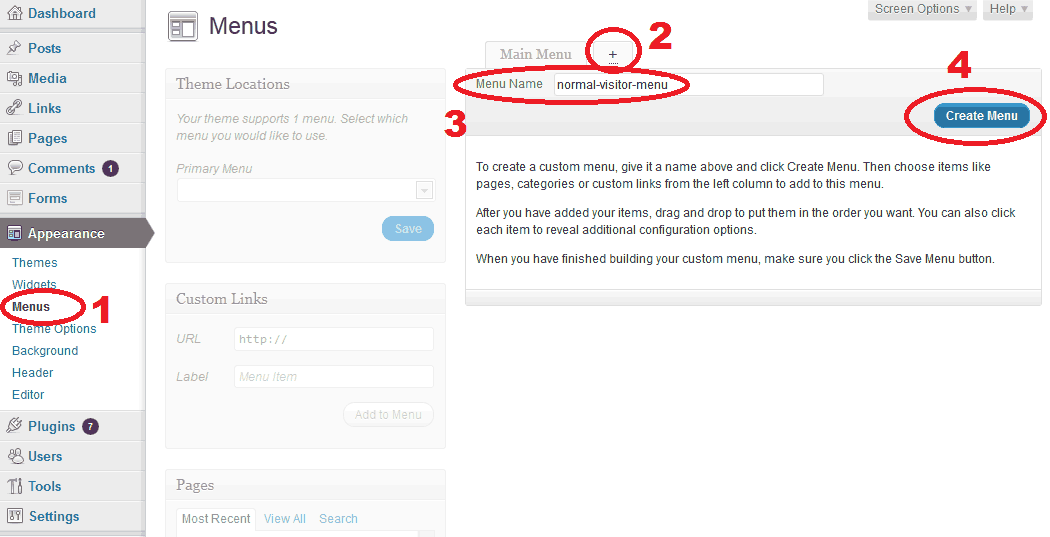
Step 3) Now, create another menu with the name “normal-visitor-menu“. we want to show this menu to our non logged in members (anyone who is not logged into the site will see this menu).
Step 4) Add whatever menu items you want to show to your normal visitors in this newly created menu and then save this menu.
That gives you two WordPress menus (one for the members and one for everyone else).
Utilizing the Newly Created Menus in Your Theme
Step 5) Find the block of code in your theme that is displaying your navigation menu (you can ask your theme developer where this line of code is). Generally the navigation menu code resides in the “header.php” template file of your theme.
Example 1: The following line of code in the “header.php” file outputs the navigation menu in the WordPress Twenty Ten theme:
<?php wp_nav_menu( array( 'container_class' => 'menu-header', 'theme_location' => 'primary' ) ); ?>
Example 2: The following line of code in the “header.php” file outputs the navigation menu in the WordPress Twenty Eleven theme:
<?php wp_nav_menu( array( 'theme_location' => 'primary' ) ); ?>
Step 6) Once you have identified the block of code that is displaying your navigation menu, replace that code with the following block of code which will output the menus we already created dynamically:
<?php
if ( wp_emember_is_member_logged_in() ) {
wp_nav_menu( array( 'menu' => 'logged-in-members' ) );
} else {
wp_nav_menu( array( 'menu' => 'normal-visitor-menu' ) );
}
?>
WordPress Twenty Ten Theme: Use the following block of code for step 6 if you are using the WordPress Twenty Ten theme:
<?php
if ( wp_emember_is_member_logged_in() ) {
    wp_nav_menu( array( 'menu' => 'logged-in-members', 'container_class' => 'menu-header' ));
}
else {
    wp_nav_menu( array( 'menu' => 'normal-visitor-menu', 'container_class' => 'menu-header' ));
}
?>
Show Different Menus to Different Membership Levels
If you want to show totally different menus to members of different membership level then you can do that too. Create your menus as usual then use the following logic:
<?php
if ( wp_emember_is_member_logged_in('1') ) {//Show this menu to members of membership level 1
    wp_nav_menu( array( 'menu' => 'level-1-menu', 'container_class' => 'menu-header' ));
}
else if ( wp_emember_is_member_logged_in('2') ) {//Show this menu to members of membership level 2
    wp_nav_menu( array( 'menu' => 'level-2-menu', 'container_class' => 'menu-header' ));
}
else if ( wp_emember_is_member_logged_in('3') ) {//Show this menu to members of membership level 3
    wp_nav_menu( array( 'menu' => 'level-3-menu', 'container_class' => 'menu-header' ));
}
else {//Show this menu to non logged in visitors
    wp_nav_menu( array( 'menu' => 'normal-visitor-menu', 'container_class' => 'menu-header' ));
}
?>

