The WP eMember membership plugin can be easily integrated with AWeber (Email marketing and Autoresponder service) so that your members get signed up to your AWeber list when they register for an account.
AWeber recently added the capability to add subscribers to a list via their API. We have updated the eMember plugin to use this new API for AWeber integration.
AWeber Integration Steps
Step 1) Make a Connection to the AWeber API
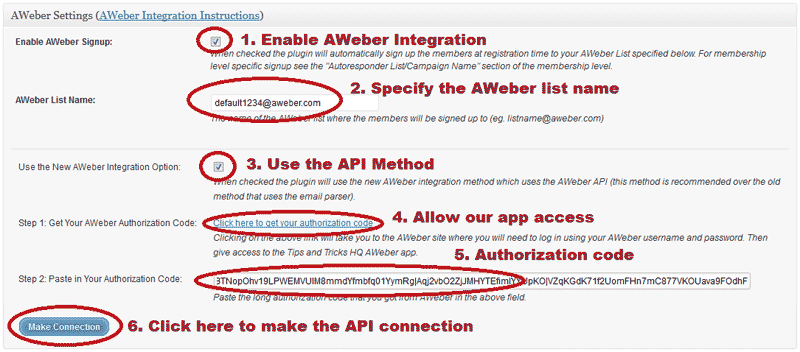
First, you need to connect with the AWeber API. In order to connect eMember with the AWeber API, go to the eMember Settings -> Autoresponder Settings menu and authorize the “Tips and Tricks HQ” app.
Click on the “Make Connection” button to start the process (see the following screenshots).

After you hit the “Make Connection” button you should see a message saying “AWeber Authorization Success” given you provided the correct authorization code. Save the settings.
Step 2) Enable the Integration
Make sure you have checked the “Enable AWeber Signup” option in the settings to enable the AWeber integration.
Step 3) Specify the AWeber List Name/ID
Next, you need to specify the AWeber list name/ID so the plugin knows which list it should signup the members.
Below is an example of how an AWeber list name/ID looks like (you get the list ID value from your AWeber account):
awlist1234567
You can specify a Global list name in the “AWeber List Name” settings field so all members get added to that list. Remember to save the settings after you make changes.
Alternatively, you can signup your members to different AWeber lists based on their membership level also. For membership level specific signup, specify the list name in the “Autoresponder List/Campaign Name” section of the membership level in question.